Safe & Secure Checkout

$8.90 Flat Rate Delivery Australia Wide

Established 2011

Couch Guard Aus  |  SKU: CGLCAK-50ML-White

Leather Repair Kit

$3800


CouchGuard® leather repair kit for your leather restoration. It contains everything you need to repair your leather couch including the Leather filler for scuffs, scratches, minor holes, grazes plus more. Leather glue for rips, tears and holes. Its flexible & durable & won't rub off onto your clothes. CouchGuard® Leather Paint is waterborne technology making it non-toxic, flexible and has the top coat sealer built right in. Just apply the colour in layers till covered and its done! With excellent rub fast properties and adhesion, it won't come off onto your clothes. Easy to follow directions are printed on the inside of our Complete Leather Repair Kits 50mL, 125mL and 500mL for different repairs. You'll also find directions on this page below.

Over 60 colours "off The Shelf" to choose from.

Description

The CouchGuard® Leather Repair Kit is ideal for leather couches and other leather surfaces like car seats, handbags, motor bike seats even shoes. Repairs such as scuffs, scratches, minor tears, burns and grazes and made easy when you use one of our Complete Leather Repair Kits. Our air dry leather filler is flexible and sand able when dry and can be applied easily using the tools provided in our leather repair kit. The same Leather Repair Products have been used in tanneries for over 70 years. We have just simplified the products for the everyday person to use saving them hundreds on repairs and thousands on recolouring. Our Leather Colours come Satin-Gloss finish, but we also do a Dulling Agent to lower the gloss level if needed. We have found that the only difference between 4 of Plushes Blacks (PL - Black) is the gloss level.

Up to five 5ml Leather Colour Changers included in the 50ml, 125ml & 500ml kits for you to match your colour  - FREE!

These are the pigment colours that make up the colour. We add them to the kits & the pigments vary depending on the colour selected.


Direction's

Scratches

Simply read these easy to follow directions and your lounge will be like new again in no time at all! 

REMEMBER: Dirty leather needs to be completely cleaned with CouchGuard® Deep Leather Cleaner before using the Leather Prep.

For Minor Scratches 

  1. Place a drop sheet or old towel around the couch to be repaired to protect floor coverings. (not supplied in the 50, 125 or 500ml kits)
  2. Make sure leather is free from contaminants like body oils etc by using our Deep Leather Cleaner. (Sold Separately) 
  3. Spray the CouchGuard® Leather Prep onto the leather to be repaired and wipe dry. The leather prep is not a leather cleaner and the leather must be recoloured after using.
  4. Lightly sand the repair area with 400 grit sand paper and 600g on the leather around around the repair. 
  5. Wipe away loose particles thoroughly.
  6. Using the spatula provided, slowly build the flexible leather filler over the scratch. Allow to air dry.
  7. If required, lightly sand with 600 grit sand paper followed by 800 grit sand paper. 
  8. Wipe area over with the damp microfibre towel before applying CouchGuard® Leather Colour. 
  9. Clean up with water.

DO NOT use the Leather Prep on freshly coloured leather. Poor preparation will lead to a poor finish even peeling. Take you time and be patient. Tip: You may use a hairdryer to help dye quicker Note: The Flexible filler is AIR DRY so keep the lid on tight when not using. Use sooner than later. It will harding.

Cuts & Holes

For Cuts Deep Scratches or Holes

Place a drop sheet or old towel around the couch to be repaired to protect floor coverings. (not supplied in the 50,125 or 500ml kits) 2 Make sure leather is free from contaminants like body oils etc by using our Deep Leather Cleaner. (Sold Separately) Spray the CouchGuard® Leather Prep onto the leather to be repaired and wipe dry. The leather prep is not a leather cleaner and the leather must be recoloured after using. Lightly sand the repair area with 400 grit sand paper and 600g on the leather around around the repair. Wipe away loose particles thoroughly. Cut the backing fabric larger then the cut or hole and place on the underside of the leather using the tweezers. Once in position, apply a small beed of CouchGuard® Leather Glue to one side of the cut and press down firmly. Now repeat on the other side. You can use a hairdryer to heat the area, activating the glue and press down firmly. Clean up any excess glue with water. Using the spatula provided, slowly build the flexible leather filler over the scratch in coats. Allow each coat to air dry. See Note: below. If required, lightly sand with 600 grit sand paper followed by 800 grit paper. Wipe area over with the damp microfibre towel before applying CouchGuard Leather Colour. Clean up with water between coats (Spatula). Note: Filling a deeper scratch, cut or hole completely with flexible leather filler all at once will just take the repair longer to dry before sanding can occur Sometimes days! Try using a small piece of leather and cut to the size of the hole then glue into place. There is a small piece on the lid of the Complete Leather Repair Kits.

Cracked Leather

Repairing Cracked Leather

Being worn, open leather, it will absorb the leather prep more so than “normal leather” so make sure the area is completely dry before applying the resin.

  1. Wash the area well with Leather Prep using a microfibre towel. Dry well
  2. Lightly sand 400g sandpaper to remove any flaking or loose topcoat.
  3. Using a sponge, apply the Leather Repair Resin in an even, thin layer to start with and allow to dry. Repeat until the area is repaired to your liking. You may also pour the resin on for larger areas and allow it to flow out remembering though, the thicker you apply it the longer it will take to dry.
  4. You may use a hairdryer to help dye quicker.
  5. Lightly sand with 400g to 600g paper and apply CouchGuard® Leather Colour to finish off the repair. You may also apply a thin layer of leather filler if needed at this point. Warning: Always test on a small hidden area before use

Recolouring

Recolouring Leather

  1. Place a drop sheet or old towel around the couch to be repaired to protect floor coverings. (supplied in the 1, 2 and 3lt kits)
  2. Make sure leather is free from contaminants like body oils etc by using our Deep Leather Cleaner. (Sold Separately)
  3. Lightly sand the leather all over with 600g sand paper to etch the surface.
  4. Spray the CouchGuard® Leather Prep onto the leather to be recoloured and wipe dry. The leather prep is not a leather cleaner and the leather must be recoloured after using.
  5. Shake the CouchGuard® Leather Colour well and poor an amount into the roller tray. Cover the foam roller with the leather colour, rolling out and excess colour and start to apply it to the leather surface.
  6. Apply the colour in layers and don’t apply too much at once. Work your way around the leather covering all the large areas 1st.
  7. Once the main large areas are recoloured, generally 4-5 coats you then need to start on the fiddly hidden bits. This is best done the next day using the foam sponge and or foam brush supplied. Use the spreaders (wall dowels) between the leather to hold it apart.
  8. Hold the leather up and apply one coat of colour. Dry using a hairdryer and repeat until covered. Once dried with the hairdryer, place a piece of white cotton cloth between the 2 surfaces for a good 24 hours. This will stop the surface sticking together.
  9. Sometimes you may find small amounts of dust or specs of dirt in the finish. Simply lightly sand the surface with 800g sand paper, reduce the leather colour with CouchGuard® Leather Reducer (10%) and apply 2 more coats. You are now done!
  10. Clean up with water. 

Tip: You may use a hairdryer to help dye quicker. Tip: The Flexible filler is AIR DRY so keep the lid on tight when not using.

You may also spray our leather colour on too if you have a compressor and spray gun. The colour will need to be reduced with CouchGuard® Leather Colour Reducer by no more than 10%.

Warning: Always test on a small hidden area before use

Tips

  • Tip 1: Rinse the sponge well in under running water and ring out the excess water before using.
  • Tip 2: Do the tape test after 1 or 2 coats to check adhesion. Once dry, apply masking tape and rub down firmly then rip off. If no colour is stuck to the tape, continue recolouring. If there is colour stuck to the tape, prep again.
  • Tip 3: After 4 coats of colour, let completely dry the lightly sand with 800g sandpaper. This will remove and debris. Reduce the colour down a little then apply two more coats.
  • Tip 4: Use the plastic dowel plugs to hold the leather apart while colouring. i.e: between seating cushions, between the seat cushion and the arm cushion etc. Once the leather is coloured and dry, move the dowel along and touch up the area.
  • Tip 5: Place a piece of cotton sheet between the cushions for 24 -36 hours once coloured and dry to stop the two sections sticking together then apply Conditioning Cream. (Sold Separately) Tip 6: You may use a hairdryer to help dye quicker.
  • Tip 7: The Flexible filler is AIR DRY so keep the lid on tight when not using. Best to use sooner than later. It will dry up in smaller quantities quicker. There are some live steams from the Brisbane Home Show on our Facebook Page showing you just how easy this transformation is. Facebook 

Warning: Always test on a small hidden area before use 

Video's

In The Box

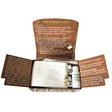
Whats In The Box Of The CouchGuard® Leather Repair Kits

Complete Leather Repair Kit 50, 125 & 250ml

  • 1 x 12g Leather Filler
  • 1 x Plastic Spatula
  • 1 x Backing Fabric 100mm x 100mm
  • 1 x 5ml Leather Glue
  • 1 x Blade
  • 1 x 400 Sand Paper
  • 1 x 600 Sand Paper
  • 1 x 800 Sand Paper
  • 1 x Tweezers
  • 1 x 50ml or 125ml Leather Colour
  • up to 5 Assorted Leather Colour Changes
  • 1 x 50ml Leather Prep
  • 1 x Foam Brush
  • 1 x Foam Sponge
  • 6 x Cotton Dabbers
  • 2 x Disposable Gloves
  • 4 x Button Towel

Coverage – Ideal for repairing scuffs, scratches, minor holes in couches & vehicle trim.

Complete Leather Repair Kit 500ml

  • 1 x 40g Leather Filler
  • 1 x Plastic Spatula
  • 1 x Backing Fabric 100mm x 100mm
  • 1 x 5ml Leather Glue
  • 1 x Blade
  • 2 x 400 Sand Paper
  • 2 x 600 Sand Paper
  • 2 x 800 Sand Paper
  • 1 x Tweezers
  • 1 x 500ml Leather Colour
  • up to 5 Assorted Leather Colour Changes
  • 1 x 50ml Leather Prep
  • 1 x Foam Brush
  • 1 x Foam Sponge
  • 6 x Cotton Dabbers
  • 2 x Disposable Gloves
  • 4 x Button Towels

Coverage – Ideal for repairing larger scuffs, scratches, minor holes in couches, dining room chairs & vehicle trim.

Larger Kits For Re-Colouring and Repairing

Complete 1lt Leather Repair Kit

  • 1 x 40g Leather Filler
  • 1 x Plastic Spatula
  • 1 x Backing Fabric 100mm x 100mm
  • 1 x 5ml Leather Glue
  • 2 x 400 Sand Paper
  • 2 x 600 Sand Paper
  • 2 x 800 Sand Paper
  • 4 x Disposable Gloves
  • 2 x Microfibre Towels
  • 1 x 1lt Leather Colour
  • 1 x 250ml Leather Prep
  • 2 x Foam Brush
  • 2 x Foam Sponge
  • 1 x 100mm Foam Roller & tray
  • 2 x Spare 100mm Foam Rollers
  • 12 x Assorted Plastic Spreaders
  • 1 x Drop Sheet

Coverage – Ideal for 1 recliner, large dining room chairs, bucket seats or equivalent.

Complete 2lt Leather Repair Kit

  • 1 x 40g Leather Filler
  • 1 x Plastic Spatula
  • 1 x Backing Fabric 100mm x 100mm
  • 1 x 5ml Leather Glue
  • 3 x 400 Sand Paper
  • 3 x 600 Sand Paper
  • 3 x 800 Sand Paper
  • 4 x Disposable Gloves
  • 2 x Microfibre Towels
  • 1 x 2lt Leather Colour
  • 2 x 250ml Leather Prep
  • 2 x Foam Brush
  • 2 x Foam Sponge
  • 1 x 100mm Foam Roller & tray
  • 2 x Spare 100mm Foam Rollers
  • 12 x Assorted Plastic Spreaders
  • 1 x Drop Sheet

Coverage – Ideal for recolouring 2 recliners, 3 seater or vehicle trim.

Complete 3lt Leather Repair Kit

  • 1 x 40g Leather Filler
  • 1 x Plastic Spatula
  • 1 x Backing Fabric 100mm x 100mm
  • 1 x 5ml Leather Glue
  • 4 x 400 Sand Paper
  • 4 x 600 Sand Paper
  • 4 x 800 Sand Paper
  • 4 x Disposable Gloves
  • 4 x Microfibre Towels
  • 3 x 1lt Leather Colour
  • 1 x 1lt Leather Prep
  • 3 x Foam Brush
  • 3 x Foam Sponge
  • 1 x 100mm Foam Roller & tray
  • 2 x Spare 100mm Foam Rollers
  • 12 x Assorted Plastic Spreaders
  • 1 x Drop Sheet

Coverage – Ideal for larger recolouring like a 2 plus 3 seater.

The 4lt and 5lt kits contain the same items as the 3lt kit.

Coverage – Ideal…for is a guide only and may vary depending on the colour being used, how its applied or what colour its being applied over”

FAQ

I would like to know how much coverage each different size kits covers?

Simply click or tap on the “In The Box” tab on the products page. Thats the Leather Repair Kits page.

There are dark patches on my couch where the head would rest?

This is common with this type of leather. It is meant to develop the worn look over time. So what ever you spill or mark it with will add character to the leather surface. This includes body and hair oils. The idea of the care kit is to clean the leather surface before replenishing the oils and waxes back into the leather hide to prevent it from drying out.

Can I use your Leather Filler before applying the dye to fill some cracks?

No. You can’t use leather filler or our Leather Repair Resin and leather dye together. The Leather Dye is alcohol based so it will soften the filler or resin. If you have an aniline leather, then no filler just dye. If you have a finished / pigmented leather then you can use the resin or filler and leather colour, which is leather paint.

I have an Aniline Leather couch with cracking on the arms. Can I use the Leather Filler and Premium Leather Dye to repair?

No. You can’t use leather filler or our Leather Repair Resin and leather dye together. The Leather Dye is alcohol based so it will soften the filler or resin. If you have an aniline leather, then no filler just dye. If you have a finished / pigmented leather then you can use the resin or filler and leather colour, which is leather paint.

Can I use your leather dye on other surfaces like suede, canvas or timber?

Yes. You can use the Comprehensive Leather Care kit on all coloured leathers and not just white. This kit is designed for pigmented and finished leathers.

Can I use the leather cleaning kit on blue leather?

Yes. You can use the Comprehensive Leather Care kit on all coloured leathers and not just white. This kit is designed for pigmented and finished leathers.

I have badly worn / cracked seating cushion. Can I use your products to repair and recolour this damage?

Yes and No. Not all leather is repairable as such. Generally the seating areas along with the arm and headrest areas are damaged from body oils, perspiration etc. The leather has absorbed these contaminates over the years so getting a permeant repair is near impossible. Adhesion may / will be an issue or those areas will crack again with little use.

You may also want to look at using our Leather Repair Resin if you don’t want to do leather panel replacements.

If you do go ahead and repair badly damaged areas and the repairs fail, please don’t blame our products when this happens.

I want to recolour my 5 seater modular. Would 500ml leather colour be enough?

We say our Leather Dye is for leather but its up to you what you want to use it on.

What are the Leather Colour Changers and how do I choose the colours from the drop down menu?

The Leather Colour Changers are the pigments that make up the actual colour. For example, Beige is made from Ochre, Black and White pigment so you would receive them in the kit. White on the other hand is made from just White Pigment but you would receive Ochre, Black and Brown pigments. You can’t choose the actual colours. We provide the Colour Changers depending on what colour repair kit you order.

What does the leather paint end up feeling like after application?

The product is specifically for leather. After its applied, your couch will still look, feel and smell like leather.

Can I use this product on vinyl?

Yes you can use this on vinyl / bonded leather. Some, not all vinyls may need the Leather Sealer applied after if it feels tacky when dry.

I have your samples and one colour is the same but called something different. Can I still use your colour?

Certainly. It makes no difference what the colour is called, as long as it looks the same.

What does the LB and PL stand for?

LB is short for Lazy Boy and PL is short for Plush. This means we have match these colours to some of their leathers.

Can I use Acetone to clean the leather?

No. Acetone will will damage the components used during the tanning process and the fibre structor of the leather.

I’ve heard that once leather is dyed, it can feel harder?

Only if the leather is hard to start with. Our Leather Colour doesn’t change the look, feel or smell of the leather. You should apply our Leather Conditioner after the recolouring process is done and completely dry – approximately 24-48hrs depending on the climate.

How much leather colour is needed to recolour a couch and whats in each kit?

Click or Tap on the “In The Box” tab when you’re on the products page to reveal a detailed list of whats in each kit plus there is a “Coverage Ideal For…” under each kit.

Can I pick up from your Coolum Beach Warehouse?

Yes you may click and collect. Best you email prior to make sure someone is in. Cash Only or order online and select “Pick Up From Coolum Beach” during checkout.

Additional Information

You May Like To Add These Too

Tips

Run water over the Leather Touch Pen tip then remove and turn around. This will help the paint to flow. Test for adhesion using the tape method. See the “Directions” for more detail. Dirty leather needs cleaning before prepping. Apply Leather conditioner to the hidden areas and crevices once all the recolouring is done and dry. This will stop the panels sticking together.

Need Assistance?

Reach out to our team today by calling 1300 268 244 or emailing info@couchguard.com.au

Customer Reviews

Be the first to write a review
0%
(0)
0%
(0)
0%
(0)
0%
(0)
0%
(0)

Featured Collections

CouchGuard® stock a huge range of recliner replacement parts from recliner handles and cables to electric recliner motors.